1. Manual Proxy Addition and Editing
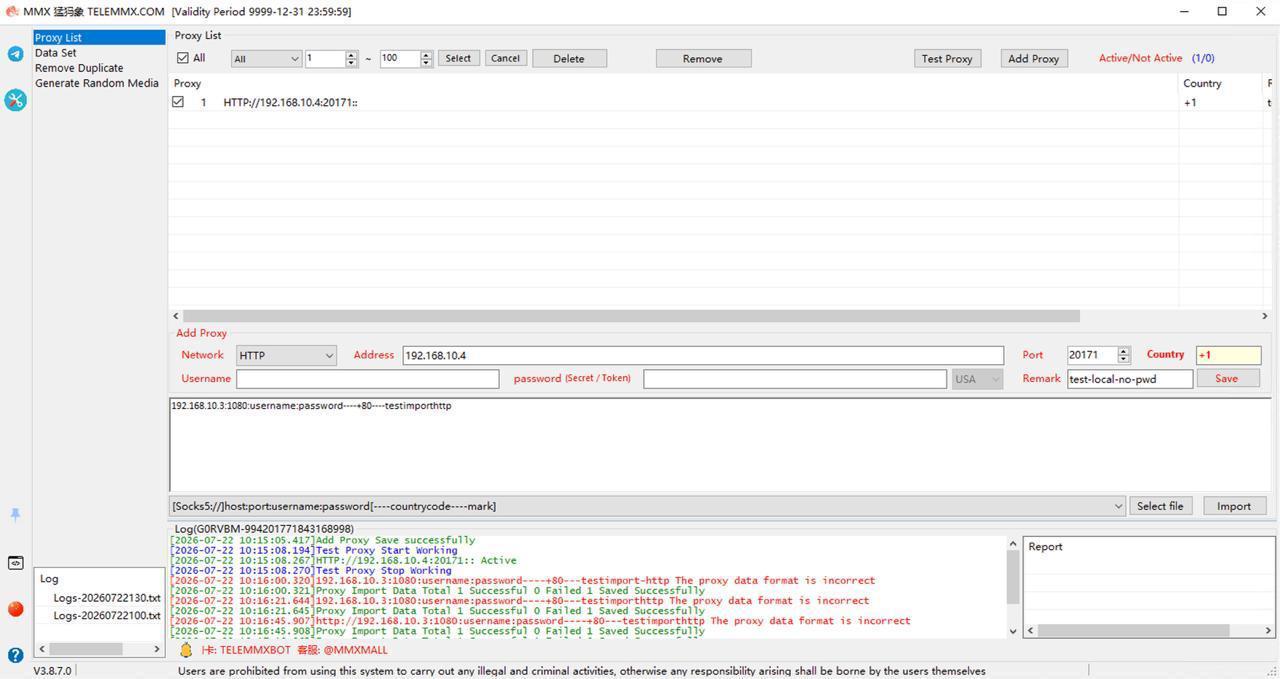
If you only have a few proxy nodes, you can manually input and configure them via the edit bar.
Steps:
- Select Network Protocol: Choose the proxy protocol type from the [Network] dropdown at the bottom left. Supported protocols include HTTP, SOCKS5, MTPROTO, and specific API provider formats (e.g., ipipgo-HTTP, roxlabs-HTTP).
- Fill Server Information: Enter the proxy server's IP or domain (e.g., 192.168.10.4) and port (e.g., 20171).
- Set Authentication: If password authentication is required, fill in username and password (Secret/Token); leave blank for IP whitelist or passwordless proxies.
- Add Markers: Optionally enter country/region (e.g., +1 or USA) and notes (e.g., test-local-no-pwd).
- Save and Test: Click [Save Proxy], check the new node, and click [Proxy Test]. If the 'Available' column shows Y, the connection is working.
2. Batch Proxy Import
For hundreds or thousands of proxies, use text file batch import.
Supported Text Formats
- Colon-separated (IP first): [Socks5://]host:port:username:password[----countrycode----mark]
- Colon-separated (account first): [Socks5://]username:password:host:port[----countrycode----mark]
- Standard URL: [Socks5://]username:password@host:port[----countrycode----mark]
- Telegram/MTProto link: MTPROTO://...server=host&port=port&secret=password...
Note: Protocol header, country code, and mark are optional; software auto-parses. Country code and mark must be preceded by 4 dashes.
Batch Import Steps
- Prepare file: Write all proxies in one of the above formats in a .txt file, one per line.
- Select format: Choose the matching parsing rule from the import dropdown menu.
- Load file: Click [Choose File] to select the text file.
- Import: Click [Import Proxy]. The console will display import logs.
3. Management and Maintenance Tips
- Clean dead nodes: Click [Delete Unavailable] to remove all failed nodes.
- Batch operations: Check the [Select All] checkbox at the top left to quickly select or deselect all nodes.
TELEMMX TGTOOLS is your Telegram automation powerhouse: auto-registration, SMS code receiving & number re-binding, and bulk account warming, cutting operational costs by 80%. Deep acquisition: keyword targeting locks in high-intent buyers, boosting conversion 5-10x. Smart marketing reach: private messaging, group seeding, and network-wide broadcasting run 24/7 unattended. Global risk control & anti-ban: built-in real-device simulation and circuit-breaker keep dead-account risk the lowest in the industry. Ops lead interception: one-click permission changes and sub-second response to hot leads.